To jest stara wersja strony!
Basics of BPM systems
Accounts
On the Groups tab (Manage menu), check the existing user groups.
As an administrator user, we will use the kermit user for the time being,
but we will also need some users who are not administrators.
Create your new user. Remember to assign a unique identifier.
A new process model
In order to get acquainted with the application, we will prepare a very simplified model of gathering offers.
Select the Processes tab from the menu. You should see 3 tabs:
My instances – to observe the existing instances of the process,
Deployed process definitions – to execute processes implemented on the Activiti platform,
Model workspace – to create new models and to implement or edit existing process models.
In the opened Activiti Modeler application window, set the process attributes (on the right side of the window).
The essential elements are the process identifier (Process identifier) and the process name (Name),
which will allow you to distinguish your process from other processes or other users' processes.
Complete also the process author field (Process author).
Simple process modelling
By dragging a Start event element from the left menu, you will start modeling the fragment of the target process.
First, model a very simplified process as presented below:
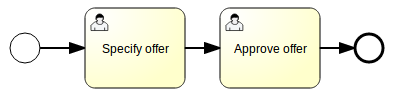
As in the case of the process, for the BPMN elements, we can set the attributes on the right side.
For Start event:
Documentation: Start proceeding with an offer.
Initiator: initiator (the user who initiated the process will be stored in this variable)
Name: Offer received
Form properties - click on … and in the new window set the properties according to the following screenshot:
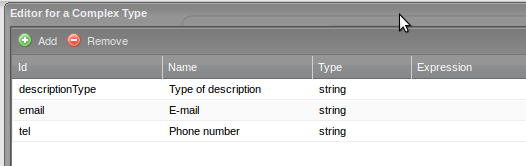
In our case, set only the variable assignee to ${initiator} – this means that as a task executor, we indicate the person who started the process.
In addition, for this task we also set Form properties:
Specifications details (id: specDetails) – level of detail of the specification of the contract offer (for now we set it as a boolean), in the next part, we will transform this variable into an enum type (accurate, sufficient, insufficient).
Person responsible (id: responsible) – a person assigned to the formal analysis of the application (responsible for carrying out the analysis); such a person will be assigned to a variable.
For now, to test such a simple process, we skip other elements of the process.
Meanwhile, let's mock one of the final tasks: Approve offer, in which set only the executor – the person who was assigned to perform the formal analysis (please use the identifier of the defined variable).
Executing a simple process model
Save a model and exit Activiti Modeler.
Go back to Activiti Explorer.
In Model workspace, select your process from the menu
and from the Model action list, choose Deploy.
You should be moved to Deployments (in Manage), where you can choose your process (click on its underlined name) in Process Definitions. After deploying the model, from the tab Deployed process definitions, you can start your process with the button Start process. You should see the following form:
 Fill in the form with any data and click Start process.
If you succeed, in the Processes → My instances, you should see an instance of your process.
Since the first task is assigned to us (the user who started the process), click the Tasks icon and go to the Inbox/ tab, where the task Specify offer should be waiting for us.
Fill the Responsible field with the name of another existing user (e.g. your previously defined user).
You can also tick a checkbox Specifications details. Then, click Complete task.
Click Processes icon and go to My instances to view the diagram, task list, and process variables.
Because the task Approve offer is waiting for your another user, log in to the account of your user and finish the task Approve offer.
Return to the admin account and check if the process has disappeared in the My instances tab.
Historic data of the process are saved in the database, which is available in the Database tab (in the Manage tab). Find the table ACT_HI_PROCINST and find your process there.
Because for this laboratory, Activiti installation with Activiti Modeler does not save models permanently, save your model on the hard disk. To do this from the menu Deployments select Show all and search for your process. Save your process file (file with extension .bpmn20.xml) and view its syntax. Note some process tag attributes, as well as the additional attributes of other process elements used by Activiti.
Extending model
Return to the Model workspace tab to extend your model with a gateway.
Depending on the level of detail of the offer specification, if it is not sufficiently detailed, we would like to ask the requester to send us additional information.
To extend your model, select the appropriate model and click Edit model.
Extend your model to the form as shown in the diagram below:
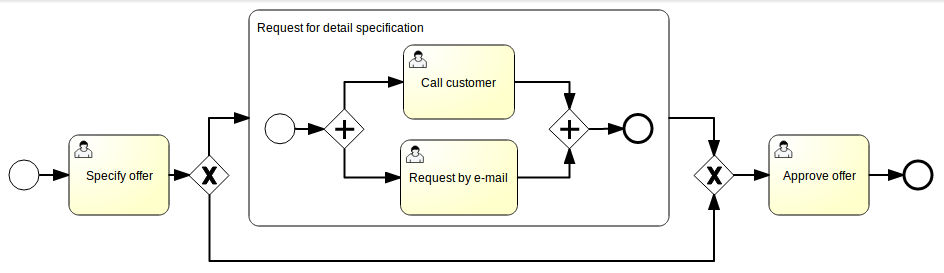
An important element of the model is the use of appropriate conditions in the flows from the XOR (exclusive) gateway (depending on the variable value specDetails).
Check in Activiti User Guide, how to define the appropriate conditions for this gateway.
Dalsza rozbudowa modelu
Timer Boundary Event
Nasz podproces składa się z dwóch zadań, polegających na tym, że kontaktujemy się z klientem mailowo oraz dodatkowo dzwonimy do niego, by poinformować o przesłanym mailu. W bardzo szczegółowej wersji powinniśmy jeszcze mieć odpowiednie zadanie z oczekiwaniem na odpowiedź od klienta – dla uproszczenia przyjmijmy, że gdy klient uszczegółowił wystarczająco przez telefon informacje, to użytkownik kończy zadanie „Call customer”, w innym wypadku nie kończy tego zadania do czasu, aż nie uzyska wystarczających informacji.
W standardowym przypadku, gdy minie deadline na składanie ofert, podproces powinien automatycznie zakończyć się i zakończyć cały proces. W tym celu rozbudujemy proces przy użyciu Timer Boundary Event:
Element Timer Boundary Event ma następujące atrybuty:
<timerEventDefinition>
    <timeDate>2012-12-06T17:00:00</timeDate>
</timerEventDefinition>
<timerEventDefinition>
    <timeDuration>P3D</timeDuration>
</timerEventDefinition>
timeCycle – ustawia powtarzające się interwały czasu, by wyzwalać zdarzenie periodycznie, np. 5 powtórzeń, z których każde trwa godzinę:
<timerEventDefinition>
    <timeCycle>R5/PT1H</timeCycle>
</timerEventDefinition>
Aby móc przetestować proces i nie czekać zbyt długo na efekty proponuję ustawić timeDuration na 2 minuty.
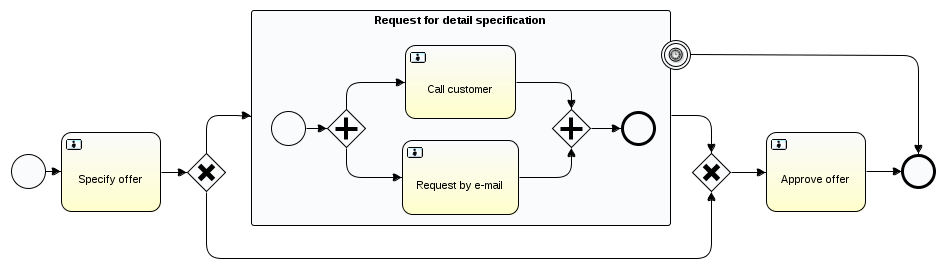
Proszę przetestować działanie swojego modelu, obejrzeć diagram instancji procesu w czasie oczekiwania (powinien wyglądać podobnie do modelu widocznego na poniższym diagramie):
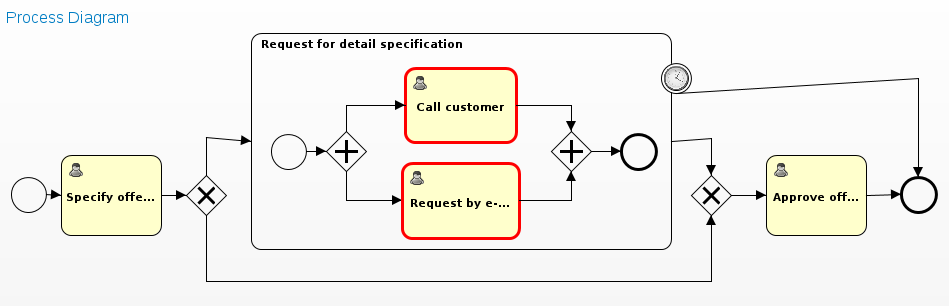
W tym momencie w zakładce Manage → Jobs powinien pojawić się nowy Timer job. W razie potrzeby istnieje tu możliwość ręcznego wyzwolenia zdarzenia przyciskiem Execute:

Mail task
Jedno z zadań w podprocesie powinno wysyłać mail do klienta.
W pełnym procesie wcześniej należałoby pobrać dodatkowe dane do przesłania maila
np. jakich szczegółów chcielibyśmy się dowiedzieć,
natomiast u nas na razie zamarkujemy działanie tego zadania.
Nie mamy skonfigurowanego serwera poczty, ale możemy zaadresować maila na adres lokalny,
np.: student@AML-Lab-316.geist.agh.edu.pl.
Po przesłaniu maila możemy sprawdzić w terminalu poleceniem mail, czy mamy go na skrzynce.
Proszę w treści maila umieścić dane trzymane w jakiejś zmiennej instancji procesu.


