Signavio Process Editor
Auxiliary materials for the laboratory:
For the needs of today's classes you can deploy Activiti platform from the website:
https://www.activiti.org/download-links (the lab is prepared for Activiti version 5)
on the Apache Tomcat or JBoss Application Server. Then, you can launch the Activiti Explorer
in your browser: http://localhost:8080/activiti-explorer,
and then sign in to your account:
login: kermit
password: kermit
You can also use the temporary server version at our server:
http://192.168.1.145:8080/activiti-explorer/ui/
When logged in, you should have noticed the top bar displaying the menu of 4 icons for administration of:
Tasks - tasks,
Processes - processes,
Reports - reports,
Manage - other issues, such as users, groups, database management, or process implementations.
Creating accounts
In the Groups tab (Manage menu), look at the existing user groups.
As an administrator user, we can use the default kermit user for a while,
but we will need a non-admin user.
So, create a new user for you. Remember about a unique identifier!
Creating a new process model
For better understanding of the BPM platform, we will create a very simplified model of the offer management process.
From the menu, select Processes. You should see 3 tabs:
My instances – to observe the existing instance of the process,
Deployed process definitions – to run processes deployed on the Activiti platform,
Model workspace – to create new models and deploy or edit existing process models.
In the Model workspace tab, click on the New Model button and create a new process model using the Activiti Modeler. Give your model a name and a description.
In the Activiti Modeler application window, set the process attributes (on the right side of the window).
The key elements are: the process identifier (Process identifier) and the process name (Name), as
using them we will be able to distinguish our process from other processes or processes of other users.
Please also fill in the author's field (Process author).
Modeling a simple process
By dragging from the left menu the Start event element, we will start modeling the process.
At the beginning, let's model a very simplified process as follows:
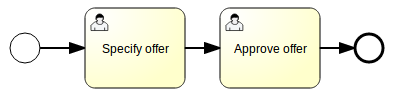
As in the case of the process, the attributes for the BPMN elements we can set on the right side of the window.
In our case, we only set the variable assignee to the value of ${initiator} – this notation means that we indicate the person who started the process (initiator) as the task performer.
Moreover, for this task, set the following Form properties:
Specifications details (id: specDetails) – the level of detail of the order specification (as for now, we can set this as a boolean, and later we will convert it to enum, for representing more values like: accurate, sufficient, insufficient).
Person responsible (id: responsible) – person assigned to the formal analysis of the request (responsible for the analysis); this is done for assigning a person and assigning it to the variable.
So far, to test such a simple process, we abandon the further elements of the process.
In the meantime, let's do one of the final tasks: Approve offer in which we set only the contractor – the person assigned to carry out the formal analysis (please use the identifier of the defined variable).
Start a simple process
After saving the model, closing the Activiti Modeler, go to Activiti Explorer.
In the Model workspace tab, select your process from the menu,
and from the list Model action choose Deploy.
You should have been moved to the Deployments tab (in Manage), where you can choose your process (by clicking on its name) in the Process Definitions
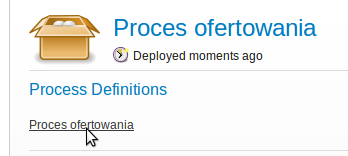 Once deployed, from the Deployed process definitions tab, you can start your process with the Start process button.
The following form should opened:
Once deployed, from the Deployed process definitions tab, you can start your process with the Start process button.
The following form should opened:
 Complete the form with any data and click Start process.
If everything is like it should be, under the tab Processes → My instances, you should see the instance of your process.
As the first task was assigned to the user who started the process, click the Tasks icon and go to the Inbox tab, where a task Specify offer should wait for you.
Fill up the Responsible field with the name of another user (eg fozzie or some predefined user); check the checkbox Specifications details. Then click Complete task.
Now click the Processes icon and go to the My instances tab to view the diagram, the task list and variables of your process.
Since the Approve offer is waiting for another user, we log in to the account of the specified user (if it was fozzie, his password is: fozzie), and then we finish the task Approve offer.
We're going back to our account, checking if in the My Instances tab, a process has disappeared.
The historical data of our process is stored in the database, which is quickly available in the Database tab (click on the Manage icon). Look for the 'ACT_HI_PROCINST' table and find your process there.
Because the installation of the Activiti with Activiti Modeler in the lab does not have a permanent database for models, we will save our model on disk. To do this, select Show all from the menu Deployments and look for our process. Please save your process file (file with extension .bpmn20.xml) and view its syntax. Check the additional attributes of the 'process' tag as well as additional attributes of other process elements and note which are used by Activiti.
Model development
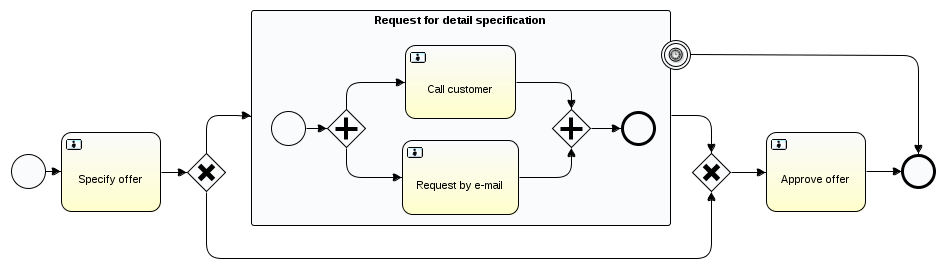
Let's go back to the Model workspace page to enhance our model with gateways.
Depending on the level of detail of the offer specifications,
if it is insufficiently detailed, we will want to ask the tenderer to provide additional information.
To enhance our model, select the appropriate model, and then click Edit model.
Please extend the model as in the following diagram:
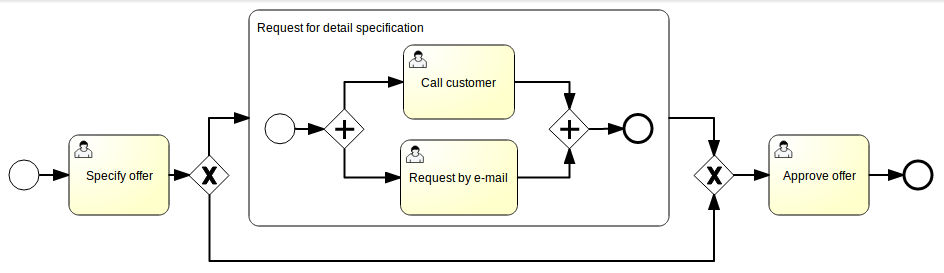
An important element of the model is the use of appropriate conditions on flows from the XOR gateway (depending on the specDetails variable value).
How to define the appropriate conditions for the gateway, you can check in the Activiti User Guide.
Further development of the model
Timer Boundary Event
Our subprocess consists of two tasks consisting in contacting the customer by email and calling to inform the customer about this email. In a very detailed version, we should have modeled the task of waiting for a response from the customer – for simplicity, let's assume that when the customer has provided enough information on the phone, the user completes the „Call customer” task; otherwise, it will not finish until obtaining sufficient information.
In the standard case, when the deadline for offer submission expires, the subprocess should automatically terminate and terminate the process. To do this, we can extend the process using the Timer Boundary Event:
The Timer Boundary Event element has the following attributes:
<timerEventDefinition>
    <timeDate>2012-12-06T17:00:00</timeDate>
</timerEventDefinition>
<timerEventDefinition>
    <timeDuration>P3D</timeDuration>
</timerEventDefinition>
<timerEventDefinition>
    <timeCycle>R5/PT1H</timeCycle>
</timerEventDefinition>
To test the process and not wait too long for effects, I suggest setting the timeDuration to 2 minutes.
Please test your model, and view the process instance diagram during this waiting (it should look similar to the model shown in the diagram below):
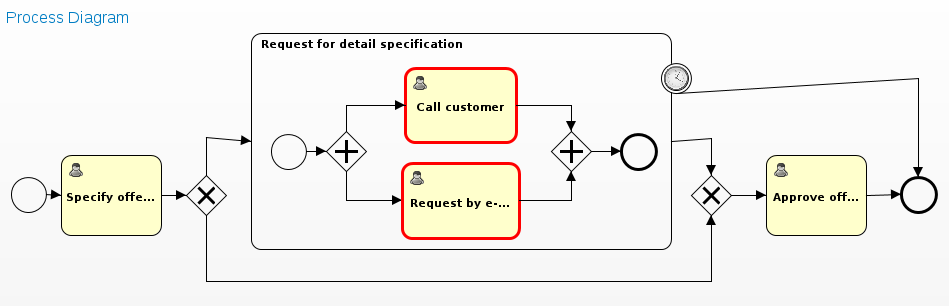
At this point, the new „Timer job” should appear in the Manage → Jobs tab. If necessary, you can manually trigger the event with the Execute button:

Task Mail
One of the tasks in the subprocess should send the mail to the client.
In the full process, this would require some additional information to send the email
like what details would you like to know.
But for now, we will just mock this task.
There is no mail server configured, but one can try to send messages to the local address, like student@AML-Lab-316.geist.agh.edu.pl (check the address at your local machine). After sending the email, we can check the terminal with mail, if we have it on the mailbox.
In the e-mail, you can also send some information stored in some variables instances of the process.


