Lab 2: Basics of working with Activiti Designer
Web Activiti Modeler has several limitations.
Activiti Designer in Eclipse environment provides more functionalities, like in the case of additional properties of elements specification.
Therefore, we will open our model in Activiti Designer and prepare a jUnit test for it.
m2e plugin installation
Project and model development
Create a new project in eclipse:
New → Project…, następnie Activiti → Activiti Project.
Next, add to the project (in src/main/resources/java)
an empty Activiti diagram (New→Other…, Activiti → Activiti Diagram).
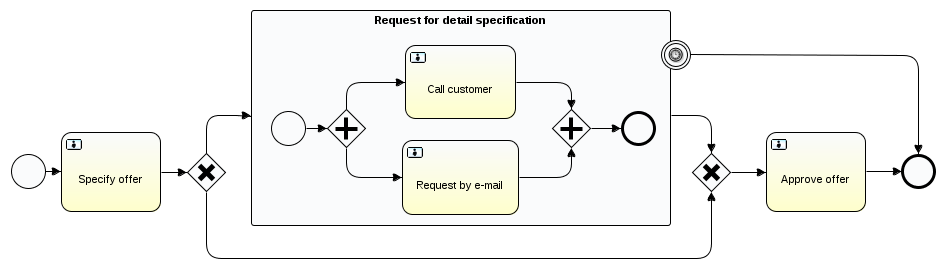
Now, design some really simple process model.
Testing the model
Convert the project: Configure → Convert to Maven Project.
Click the right mouse button on the project tree
and select:
Activiti→Generate unit test.
In src/test/java/org/activiti/designer/test, a JUnit test should be now available.
Run the test and check if it passed or failed.
If the test did not pass properly because e.g. not all libraries could be loaded,
please adjust the version of Activiti on your computer.
To do this, we need to change the version of Actviti to 5.XX (where XX is the correct version) in the 'pom.xml' file.
You can also check the configuration file activiti.cfg.xml describing the Activiti mode. It should be in the directory: src/main/resources/.
Using ActivitiRule,
we have access to relevant services that provide interfaces for various functionalities:
RepositoryService – provides functionality for deployment, query execution, or process removal,
RuntimeService – provides the interface for starting and executing queries to process instances (including their variables);
-
TaskService – provides the interface for managing tasks.
FormService – provides the interface for managing forms.
RepositoryService repositoryService = activitiRule.getRepositoryService();
RuntimeService runtimeService       = activitiRule.getRuntimeService();
IdentityService identityService     = activitiRule.getIdentityService();
TaskService taskService             = activitiRule.getTaskService();
FormService formService             = activitiRule.getFormService();
Extending the test
Using the interface available through TaskService and FormService , test the model from the previous classes (as below, if not timed) for two scenarios (selecting each of the XOR gateways).
Useful snippets of code:
identityService.setAuthenticatedUserId("kermit");
List<Task> taskList = taskService.createTaskQuery().processInstanceId(arg0).taskAssignee(arg0).list()
taskService.complete(arg0);
FormService formService = processEngine.getFormService();
TaskFormData taskFormData = formService.getTaskFormData(taskList.get(0).getId());
List<FormProperty> formList = taskFormData.getFormProperties();
For more information check Activiti API.
Executing the process
Based on the code used in the unit tests, we can also write a simple application that will launch the process engine for a specific process.
In a standalone application, you can create a process engine using:
ProcessEngine processEngine = pc.buildProcessEngine();
and then, as before, have access to the appropriate services that provide interfaces to the various functionalities:
- OfferProcessingExecution.java
import java.util.*;
import org.activiti.engine.*;
import org.activiti.engine.runtime.ProcessInstance;

public class OfferProcessingExecution {

	public static void main(String [] args)
	{
		ProcessEngineConfiguration pc = ProcessEngineConfiguration
				.createStandaloneInMemProcessEngineConfiguration();

		ProcessEngine processEngine = pc.buildProcessEngine();
		RepositoryService repositoryService = processEngine.getRepositoryService();
		RuntimeService runtimeService = processEngine.getRuntimeService();
		IdentityService identityService = processEngine.getIdentityService();
		repositoryService.createDeployment()
			.addClasspathResource("diagrams/name.bpmn20.xml")  /* file name */
			.deploy();

		Map<String, Object> variableMap = new HashMap<String, Object>();
		variableMap.put("descriptionType", "short");
		...
		identityService.setAuthenticatedUserId("kermit");
		ProcessInstance processInstance =                     /* provide process id (from the diagram) */
                                      runtimeService.startProcessInstanceByKey("process-id", variableMap);
		System.out.println("process instance id: " + processInstance.getId());
	}
}
Check the Activiti Engine API and extend your process management application.
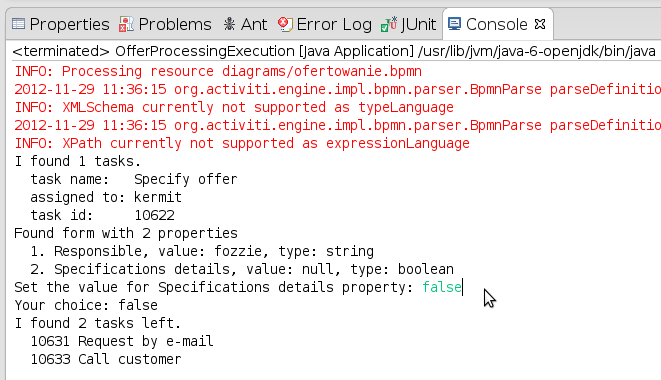
One possibility of the extension is to start your process with the parameters set in the same way as in the jUnit test. But, at the appropriate time, the application should ask a user for the Specifications details and set this value as a process variable (to set the value you can use RuntimeService.setVariable.
An example screenshot of such application: