To jest stara wersja strony!
Signavio Process Editor
Auxiliary materials for the laboratory:
For the needs of today's classes you can deploy Activiti platform from the website:
https://www.activiti.org/download-links (the lab is prepared for Activiti version 5)
on the Apache Tomcat or JBoss Application Server. Then, you can launch the Activiti Explorer
in your browser: http://localhost:8080/activiti-explorer,
and then sign in to your account:
login: kermit
password: kermit
You can also use the temporary server version at our server: http://192.168.1.145:8080/activiti-explorer/ui/
When logged in, you should have noticed the top bar displaying the menu of 4 icons for administration of:
Tasks - tasks,
Processes - processes,
Reports - reports,
Manage - other issues, such as users, groups, database management, or process implementations.
Creating accounts
In the Groups tab (Manage menu), look at the existing user groups.
As an administrator user, we can use the default kermit user for a while,
but we will need a non-admin user.
So, create a new user for you. Remember about a unique identifier!
Assign your user to some groups but not the Admin group.
Creating a new process model
For better understanding of the BPM platform, we will create a very simplified model of the offer management process.
From the menu, select Processes. You should see 3 tabs:
My instances – to observe the existing instance of the process,
Deployed process definitions – to run processes deployed on the Activiti platform,
Model workspace – to create new models and deploy or edit existing process models.
In the Model workspace tab, click on the New Model button and create a new process model using the Activiti Modeler. Give your model a name and a description.
In the Activiti Modeler application window, set the process attributes (on the right side of the window).
The key elements are: the process identifier (Process identifier) and the process name (Name), as
using them we will be able to distinguish our process from other processes or processes of other users.
Please also fill in the author's field (Process author).
Modeling a simple process
By dragging from the left menu the Start event element, we will start modeling the process.
At the beginning, let's model a very simplified process as follows:
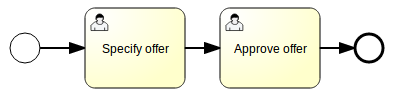
As in the case of the process, the attributes for the BPMN elements we can set on the right side of the window.
In our case, we only set the variable assignee to the value of ${initiator} – this notation means that we indicate the person who started the process (initiator) as the task performer.
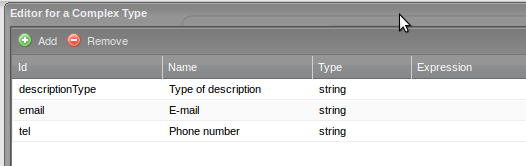
Moreover, for this task, set the following Form properties:
Specifications details (id: specDetails) – the level of detail of the order specification (as for now, we can set this as a boolean, and later we will convert it to enum, for representing more values like: accurate, sufficient, insufficient).
Person responsible (id: responsible) – person assigned to the formal analysis of the request (responsible for the analysis); this is done for assigning a person and assigning it to the variable.


